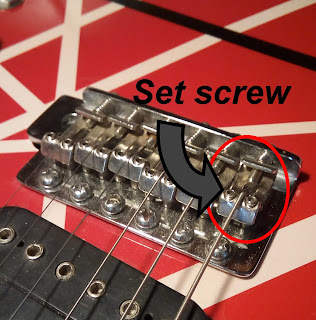
The string height (distance between the strings and the frets) is adjusted at the bridge. On Fender style guitars, this is set by individually adjusting the height of each bridge saddle via the little set screws in it. Use an allen key to turn the screws, and try to keep the saddle level as you raise or lower it.
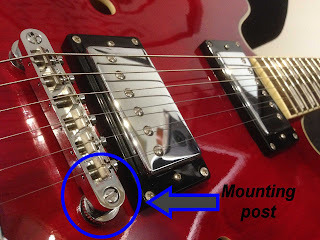
On a Gibson style guitar, the string height is set by changing the height of the two mounting posts, which is done by either turning the posts with a screwdriver or turning the thumbwheels on the posts, depending on the type of bridge.
Now you could just go and randomly start raising and lowering stuff until you find something that feels good, but there's an easier, more precise method of going about this.
If your guitar has a Fender style bridge, you'll need a set of radius gauges so that you can set the strings to follow the curve (radius) of the fretboard. If you want a quick, free set of gauges, you can print out the ones that I've included a link to below. Gibson style bridges don't allow you to independently set the height of different strings and are built to match the radius, so you shouldn't need a radius gauge for them.
http://pickguardian.com/wp-content/uploads/2014/04/Pickguardian-Neck-Radius-Gauges.pdf
I've used these gauges a lot myself, and they work pretty well.
Alright. So, if you're working with a Fender style bridge, first use your radius gauges to measure the fretboard without the strings and find its radius. Next (with the strings on, of course) you set the height of the two E strings. Once you have those set, place the radius gauge (the one that matched the fretboard) on top of the strings at the bridge and adjust the four middle strings up or down until you have the gauge resting comfortably on the E strings with the other four strings lightly touching the gauge.
Ultimately, the final height is up to you, so you should experiment and take time to find what feels best to you. A good starting point, though, is 4/64" for the high E string (lightest string) and 5/64" for the low E. Try experimenting from there to determine what you think best suits you.
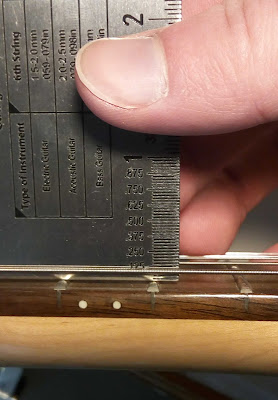
To measure your string height, use your measuring device to find the distance between the top of the 12th fret and the bottom of the string. See the first picture for an example.
If your guitar has a Gibson style bridge, it's an even simpler process. Adjust the two mounting posts to get the E strings where you want them, and the rest of the strings automatically get adjusted correctly with them.
With your guitar's neck relief and action set, it should be feeling great to play now. In the next part of this series, I'll show you how to set pickup height so that your pickups give you their best sound and don't affect the string vibration.


Comments
Post a Comment