
Building an A/B Switch

a/b switch schematic

Parts needed:

3x Mono 1/4" Jacks
1x 3PDT Latching Footswitch (Or a DPDT. Either will work)

This is the simplest type of A/B switch. Some people wire the sleeves (Slv on the diagram) together in a chain and then to the switch, but I do it differently, wiring them all to separate lugs on the footswitch, to keep the grounds isolated for noise efficiency purposes.
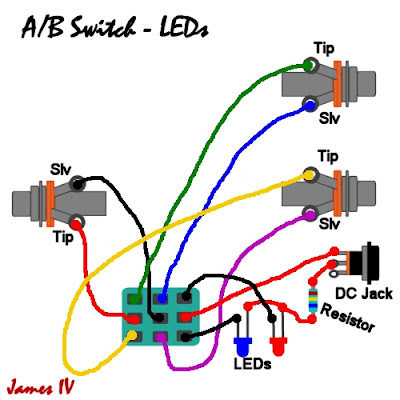
----------


a/b switch schematic

Parts Needed:

3x Mono 1/4" Jacks
1x 3PDT Latching Footswitch
2x LEDs
2x LED Bezels (Optional)
1x DC Jack
1x 1/4 watt resistor

Mount the parts in your enclosure and then solder everything as shown on the diagram. To mount the LEDs, you can either use LED bezels, or drill holes for them the same size as the LED (most likely 5mm or 3mm) and push the LED up into from the inside of the enclosure. If you aren't using bezels and the LED isn't staying in the hole, you can hold it in place with a bit of glue. 

For the resistor, the standard value is 4.7K. If you want the lights to be brighter though, use a lower value resistor such as 2.2K.

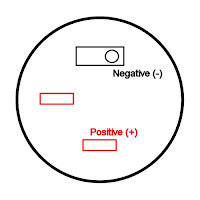
When wiring the DC jack, use the diagram below. The positive is wired to the resistor, which is then wired to the longer leg of the LEDs, and the negative is wired directly to the footswitch.
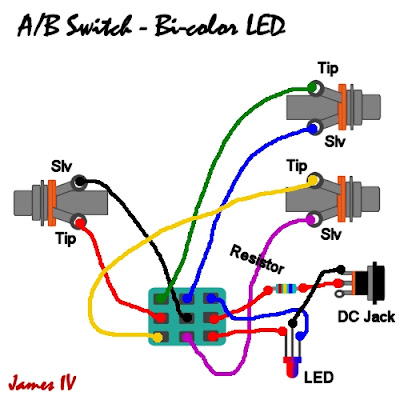
dc jack layout

----------


a/b switch schematic

Parts Needed:

3x Mono 1/4" Jacks
1x 3PDT Latching Footswitch
1x Bi-color LED
1x LED Bezel (optional)
1x DC Jack
1x 1/4 watt resistor

This version is pretty much the same as the previous one, but it has the benefit of using a single LED which changes colors, based on whichever output is active. 

The LED is wired a little differently here. The positive of the DC jack is wired to the resistor, which is then wired to the middle lug on the third row of the footswitch. The middle prong of the LED is wired to the ground on the DC jack, and the remaining two prongs are wired to the footswitch.


Comments

Popular posts from this blog

Turning a Tone Pot into a No-Load or Blend Pot

A no-load pot has several cool uses in guitar wiring. For one, it can replace a standard tone pot. Typical tone controls still have an effect, even when turned all the way up, but a no-load pot will essentially take the tone control out of the circuit, when turned up to 10. You can also use one as a blend pot to blend pickups into each other. You can buy a no-load pot, or you can make one out of a regular pot. Here's how I turned a standard CTS pot into a no-load pot to use as a blender. Tools you need: Tiny flathead screwdriver, or something similar Needle-nose pliers Xacto knife Steps: Start taking apart the pot by using the screwdriver to pry up the four tabs circled in red in the picture below. Then use the needle-nose pliers to bend them back. Don't bend them too far, or they might break - just bend them enough so that they're about straight. It should look something like this: Next, take the threaded shaft off. Then take off...

Figuring Out an Old Jackson Superswitch

Just recently, I was working on a very cool 1980's Jackson (above). The pickups had been upgraded to Seymour Duncans, and I got to rewire it. The guitar had already been to two different places, but neither of them were able to figure out how to get the wiring to work because the 5-way superswitch (below) is different from others. (Note that the picture above is not the original wiring. It's one of the failed attempts.) Apparently, this switch was unique to 80's era Jackson guitars. They called it the JE-0005 5-Way Switch, and it was a big selling point that they advertised in their catalogs. Looking through a Jackson catalog from 1987 on their online archives, I found a picture of a guitar with a similar paint job and a section telling about the switch. You can see the catalog here:  http://support.jacksonguitars.com/catalogs/us/Jackson1987_catalog.pdf Neither of the places that worked on this particular guitar were able to find information...

How to Set Up a Guitar Basics: Pt 1 - Truss Rod Adjustment

Setting up your guitar is the number one - if not the only - change you can make to your guitar that will automatically make your playing better. Other modifications, such as changing the pickups, can make your guitar sound better, but a good setup will make your playing much easier and more effortless. A basic setup has four steps, which should be performed in order. I'm going to dedicate a separate post to each step. Adjust the truss rod (this post) Set the string height Set the pickup height Adjust the intonation Adjusting the truss rod : Contrary to what some people think, the truss rod is not something you turn to make the strings higher or lower. Rather, its purpose is to adjust the straightness of the guitar neck. The pull exerted by the strings bend the neck, as a general rule, in the same way that a bow and arrow bend when the bowstring is pulled. The truss rod controls how much relief (bend) the neck has. Turning it to the right will straighten the ne...